Garage Door Insulation Kit: How to Insulate a Garage Door (2026 Guide)
How to insulate a garage door with a reflective kit: R-value comparison, step-by-step install, and the best garage door insulation for hot climates. Drop garage temps 15–20°F.
An uninsulated garage door can hit 130°F in summer and drop to outside temperature in winter, dragging the rest of the house with it. A reflective insulation kit takes about 90 minutes to install, costs less than a tank of gas, and drops summer garage temps by 15–20°F.
This covers what R-value you actually need, which insulation method works best for your door type, the step-by-step install, and the mistakes that ruin the result.
Why Insulate a Garage Door?
Most garage doors are a thin sheet of steel or aluminum, sometimes with a hollow air cavity, often with no insulation at all. That single panel is your only barrier between conditioned interior air and the outside. In summer, the south-facing surface can hit 140°F. In winter, the inside surface drops to whatever the outdoor temperature is.
The hidden energy leak
A standard uninsulated steel garage door has an R-value of just R-1 to R-2. For comparison, a typical exterior wall is R-13 to R-21. That single door can leak more heat than the entire wall it sits in.
Six things change after insulating:
15–20°F cooler in summer
Reflective insulation blocks up to 95% of radiant heat, the dominant heat source on a sun-exposed door.
Warmer in winter
Slows conductive heat loss through the door, keeping the garage closer to indoor temperature.
Lower energy bills
Attached garages share a wall with the house. A hot or cold garage drives up HVAC costs.
Quieter operation
The insulation layer dampens vibration and outside noise, making the door noticeably quieter.
Stronger door panel
Adds rigidity to thin steel panels, reducing dents and improving long-term durability.
Protects stored items
Tools, paint, electronics, and vehicles all degrade faster in extreme garage temperatures.
If your garage is attached to the house, the upgrade pays back even faster. Every degree the garage swings drives the adjacent room temperature with it.
What R-Value Do You Need for a Garage Door?
R-value measures resistance to conductive heat flow. Higher is better for traditional insulation. But for garage doors, the dominant heat transfer mode is radiant, not conductive. That’s why reflective garage door insulation outperforms thicker fiberglass and foam in real-world testing.
| Door Insulation Type | R-Value | Radiant Reflection | Real-World Result |
|---|---|---|---|
| Uninsulated steel door | R-1 to R-2 | 0% | Hot in summer, freezing in winter |
| Foam board (½ inch) | R-3 to R-4 | 0% | Modest improvement |
| Reflective bubble kit | R-6 to R-7.5 | Up to 95% | Major drop in surface temp |
| Polyurethane foam (factory) | R-12 to R-18 | 0% | Best conductive performance |
| Reflective + foam combo | R-9 to R-15 | Up to 95% | Maximum total performance |
For retrofit DIY installs, reflective bubble kits give the best performance per dollar.
Why reflective beats higher R-value foam
On a sun-exposed garage door, 70–80% of the heat reaching the inside surface is radiant infrared energy. A foam panel with R-6 absorbs that heat then re-emits it. A reflective foil surface with the same R-value reflects 95% of it back outside before it ever enters. This is why reflective insulation routinely wins surface-temperature tests against thicker conventional materials.
Types of Garage Door Insulation: Which Is Best?
There are four common methods. Each has its place, but for a retrofit on an existing door, only two are practical.
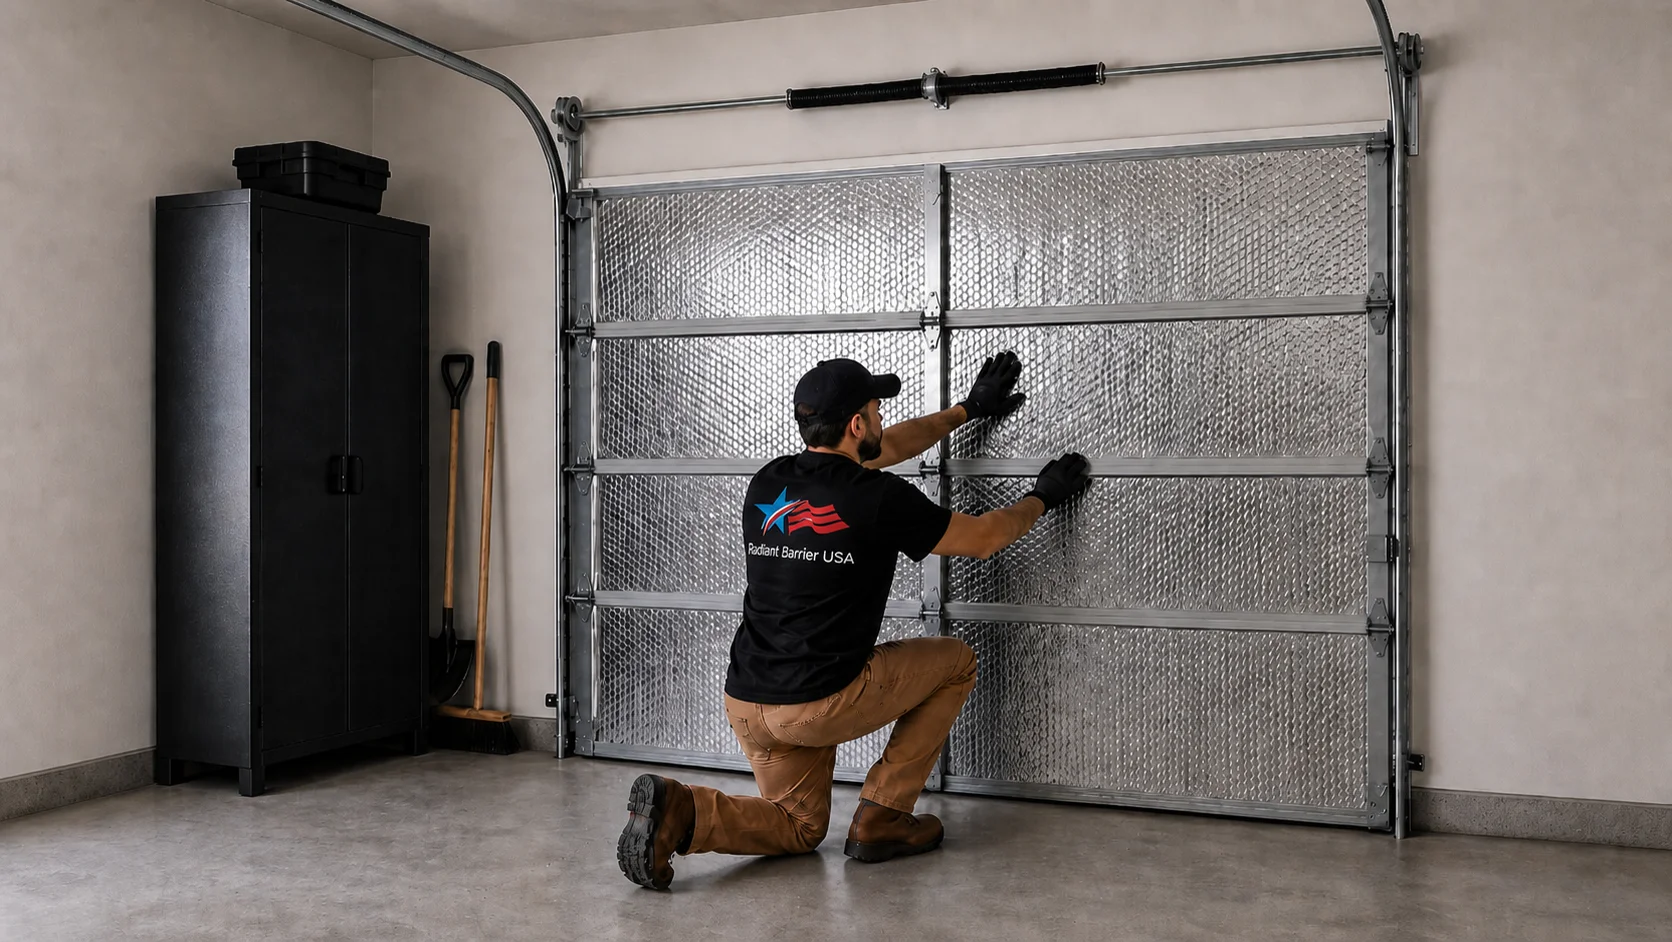
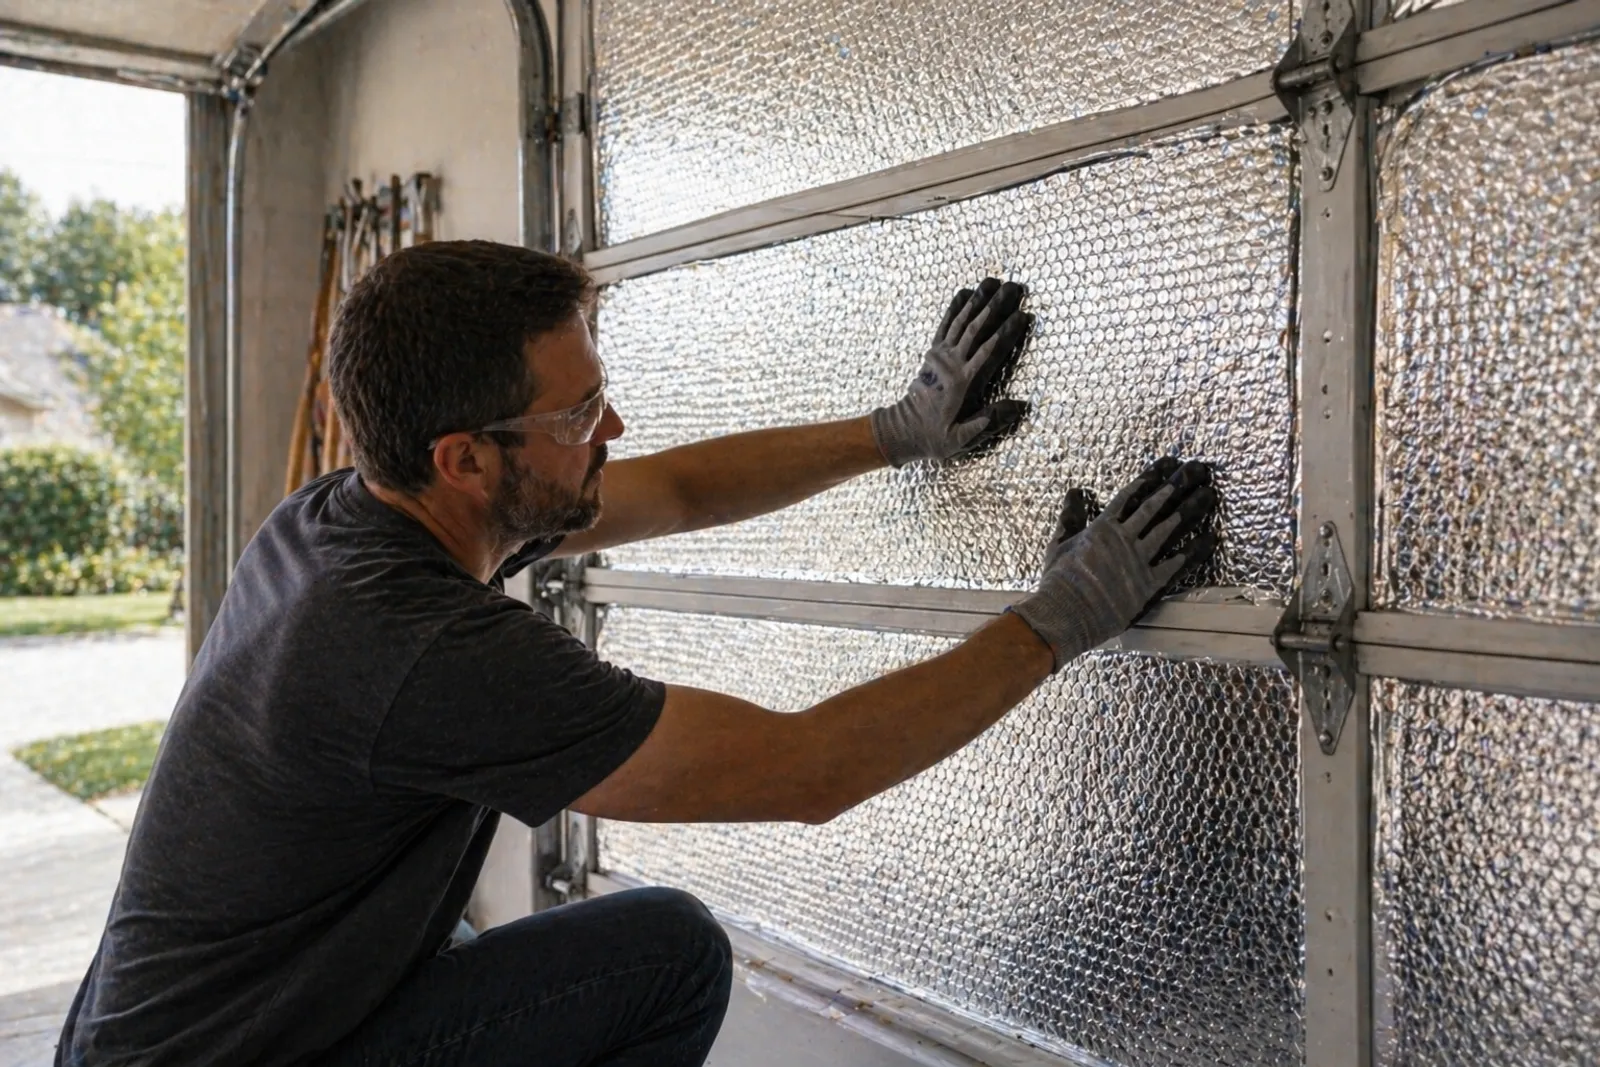
1. Reflective Bubble Kits (recommended for DIY)
A roll of double-bubble reflective insulation cut to fit between the door’s horizontal rails. Held in place with double-sided tape and aluminum foil tape on the seams. Lightweight (10–12 lbs total), no tools beyond a utility knife, and balanced enough not to throw off the door’s spring tension.
2. Rigid Foam Panels (R-3 to R-6)
½-inch or ¾-inch polystyrene panels cut to fit each rail section, held in place by retainers. Higher R-value than foil alone but adds significant weight and may require spring re-tensioning. No radiant reflection.
3. Pre-Insulated Replacement Doors
Polyurethane-injected sandwich doors come from the factory at R-12 to R-18. The right move if your door is failing or you’re building new, but a $1,500–$3,500 upgrade vs. $80 for a kit.
4. Spray Foam (not recommended)
Expanding foam looks like a quick fix but unbalances the door, can cause panels to bow, voids most warranties, and is impossible to remove cleanly. Skip it.
| Method | Cost | Install Time | Spring Re-tension? |
|---|---|---|---|
| Reflective bubble kit | $70–$120 | 60–90 min | No |
| Rigid foam panels | $80–$150 | 1–2 hours | Sometimes |
| Pre-insulated new door | $1,500–$3,500 | Half day (pro) | N/A (new door) |
| Spray foam | $60–$100 | 1–2 hours | Yes (if door survives) |
Measuring Your Garage Door
A standard single garage door is 8–9 feet wide × 7 feet tall. A double door is 16 feet × 7 feet. But the panel count and rail spacing vary, so always measure first.
- 1
Count the horizontal sections
Most garage doors have 4 sections. Some have 5. Each section is its own insulation panel.
- 2
Measure the section height
From the bottom rail to the top rail of one section. Usually 21 inches for a 7-foot door, or 18 inches for an 8-foot door.
- 3
Measure the section width
From inside-rail to inside-rail. This is the panel width you’ll cut your insulation to fit.
- 4
Calculate total square footage
For a single 9’ × 7’ door with 4 sections: ~63 sq ft of insulation. For a double 16’ × 7’ door: ~112 sq ft. Add 10% for cuts and overlaps.
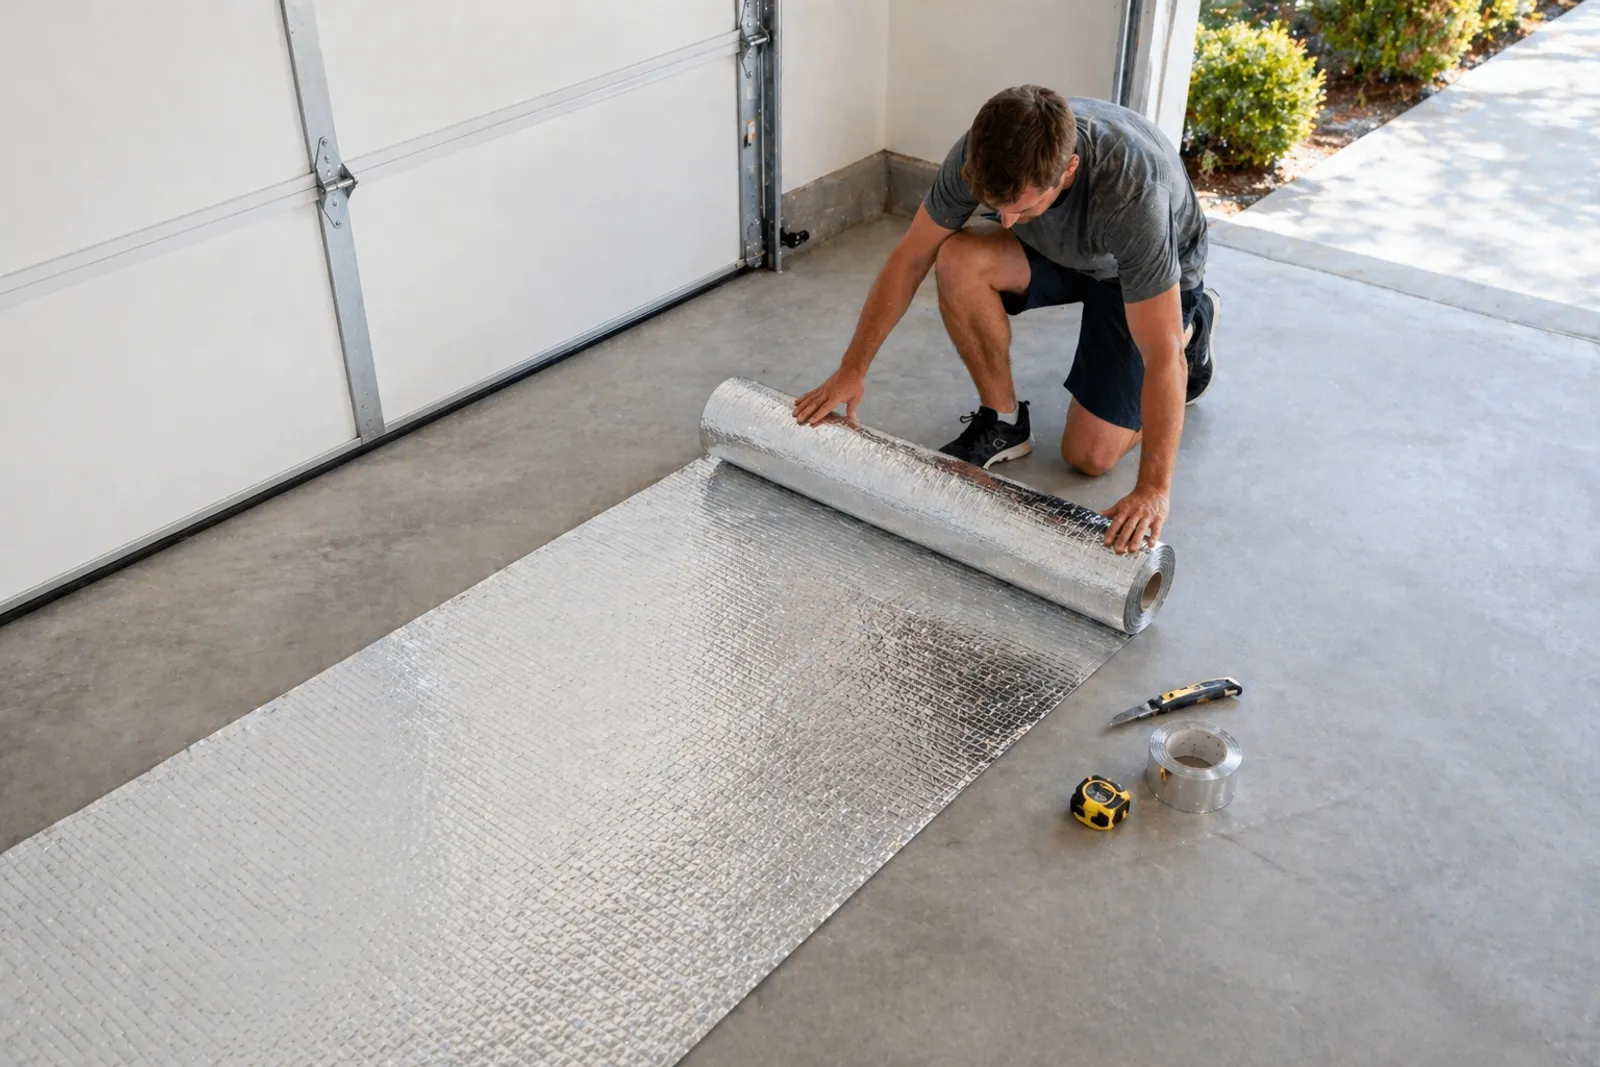
A standard 2’ × 80’ reflective bubble roll covers 160 sq ft, enough for one double door or two single doors.
How to Insulate a Garage Door: Step-by-Step
Plan for 60–90 minutes for a single door, 90–120 minutes for a double. Pick a day when the garage is in shade so you’re not working against direct sun.
Tools and Materials You’ll Need
- Reflective bubble insulation roll (sized for your door, see above)
- Double-sided foam mounting tape (usually included in kits)
- Aluminum foil tape (for seam sealing, included in kits)
- Tape measure
- Sharp utility knife (or heavy scissors)
- Marker or pencil
- Step ladder or stepstool
- Optional: gloves
- 1
Close the door and clean the panels
Lower the door fully. Wipe each panel down with a damp cloth and let dry completely. Adhesive tape won’t bond to dust, oil, or cobwebs.
- 2
Measure each section individually
Don’t assume all sections are identical. Measure inside-rail to inside-rail and top-rail to bottom-rail for every panel.
Subtract ¼ inch from both width and height so the insulation slides in without binding against the rails.
- 3
Cut the insulation
Roll out the bubble insulation foil-side down on a clean floor. Mark your cut lines with a pencil. Cut with a utility knife against a straight edge. A sharp single pass beats sawing.
Cut all panels for the door before installing. Keep the foil side facing the same direction on every piece (this side faces outward when installed).
- 4
Apply double-sided tape
Stick double-sided foam tape to the inside of each garage door panel, typically 4 strips per panel: top, bottom, and two diagonals. Press firmly so the tape bonds to the steel.
Don’t peel the second backing yet.
- 5
Install each insulation panel
Peel the second tape backing one panel at a time. Press the cut insulation against the tape. Foil side faces outward (toward the door panel), bubble side faces into the garage.
Smooth from the center out to remove air pockets.
- 6
Seal the seams with foil tape
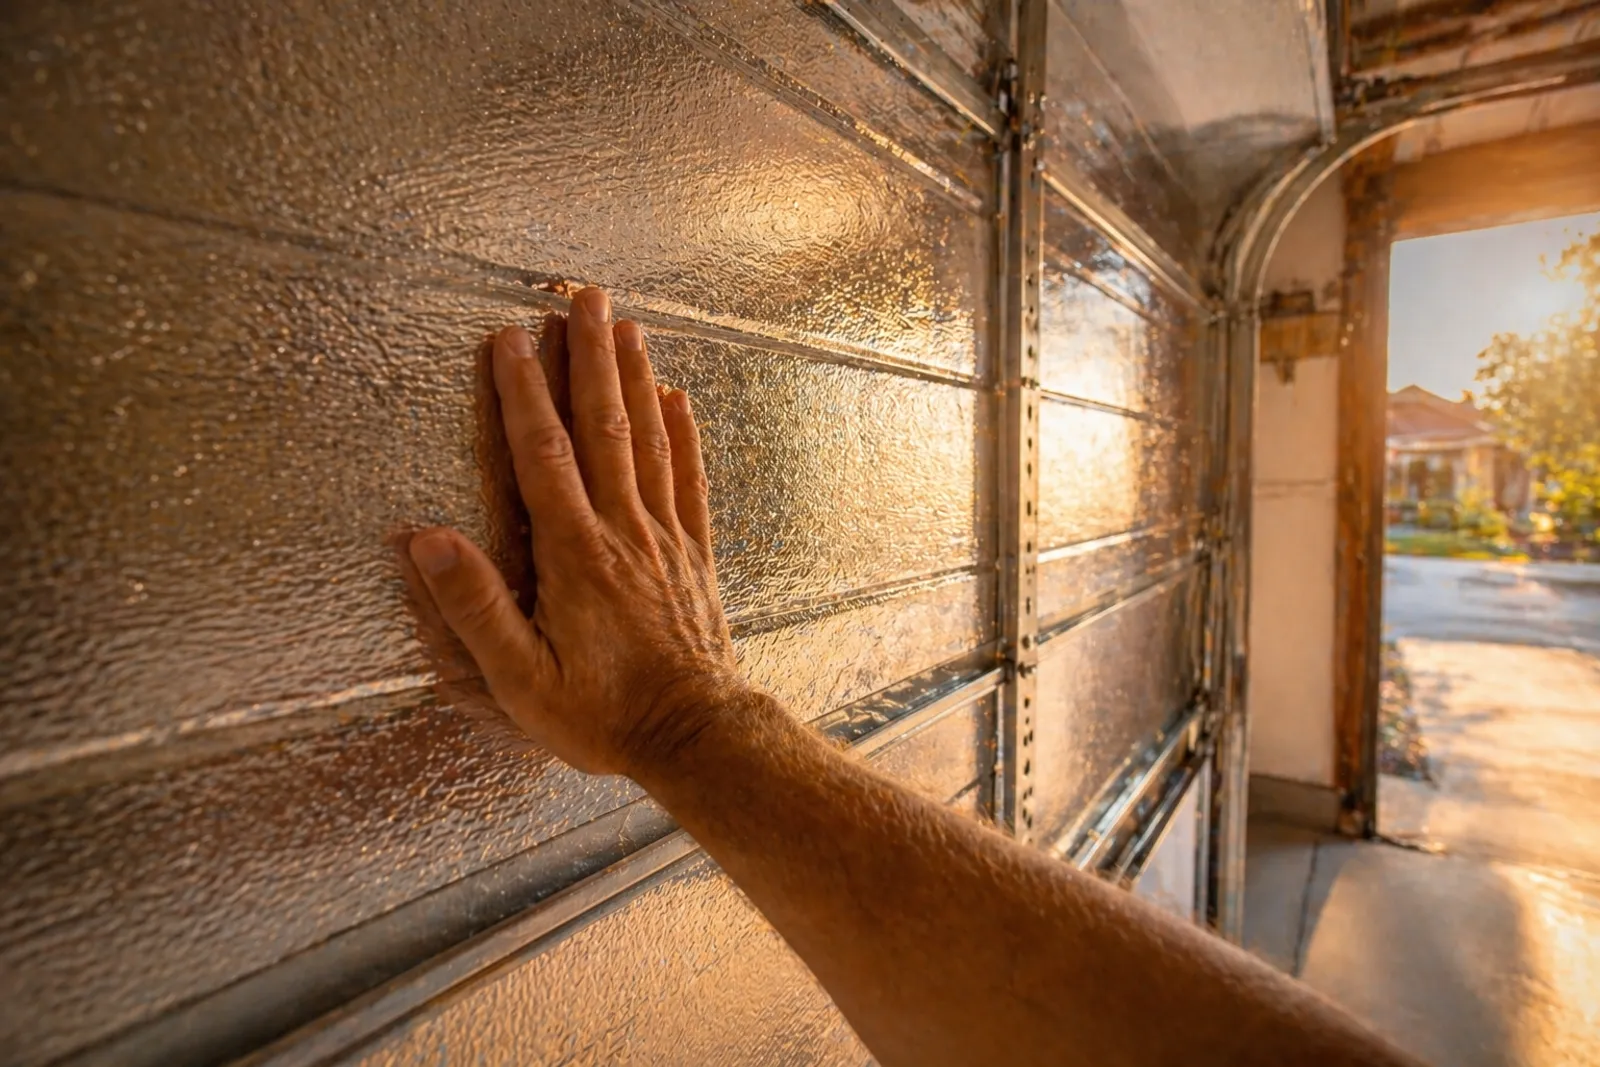
Run aluminum foil tape along every edge where the insulation meets the rails, and along any seams between insulation pieces. This creates a continuous reflective surface and prevents heat from sneaking around the panels.
- 7
Test the door
Open and close the door 2–3 times. It should run smoothly with no new noise or hesitation. If the door feels heavier or the opener strains, the spring tension may need adjustment. Call a pro. Do not adjust torsion springs yourself.
Result you should expect
On a sunny 95°F day, the inside surface of the door should feel noticeably cooler to the touch within 24 hours. A laser thermometer typically shows a 30–50°F drop on the interior surface, and overall garage air temp drops 15–20°F over a few days as thermal mass equalizes.
DIY vs Professional Cost
Complete kit with insulation, tapes, and instructions. 60–90 min install.
Two singles or one double-sized roll. 90–120 min install.
Some retailers and door companies install kits. Adds $200–$300 in labor.
DIY is the right call here. The kit comes pre-sized, the tools are basic, and there’s no electrical, plumbing, or structural work involved.
Recommended Product: Garage Door Insulation Kit
Garage Door Insulation Kit
A complete DIY kit with extra heavy-duty double bubble reflective insulation, double-sided mounting tape, and aluminum foil seam tape. Cuts to fit most standard doors and delivers up to R-7.5 with 95% radiant heat reflection.
- Up to R-7.5 effective insulation with 95% radiant heat reflection
- Extra heavy-duty double bubble construction (E=5% emissivity)
- 2' × 80' roll covers up to 160 sq ft, fits single or double doors
- Includes double-sided mounting tape and aluminum foil seam tape
- ASTM Class 1 / Class A fire rated
- Odorless, non-toxic, and corrosion-resistant. Won't rot or grow mold.
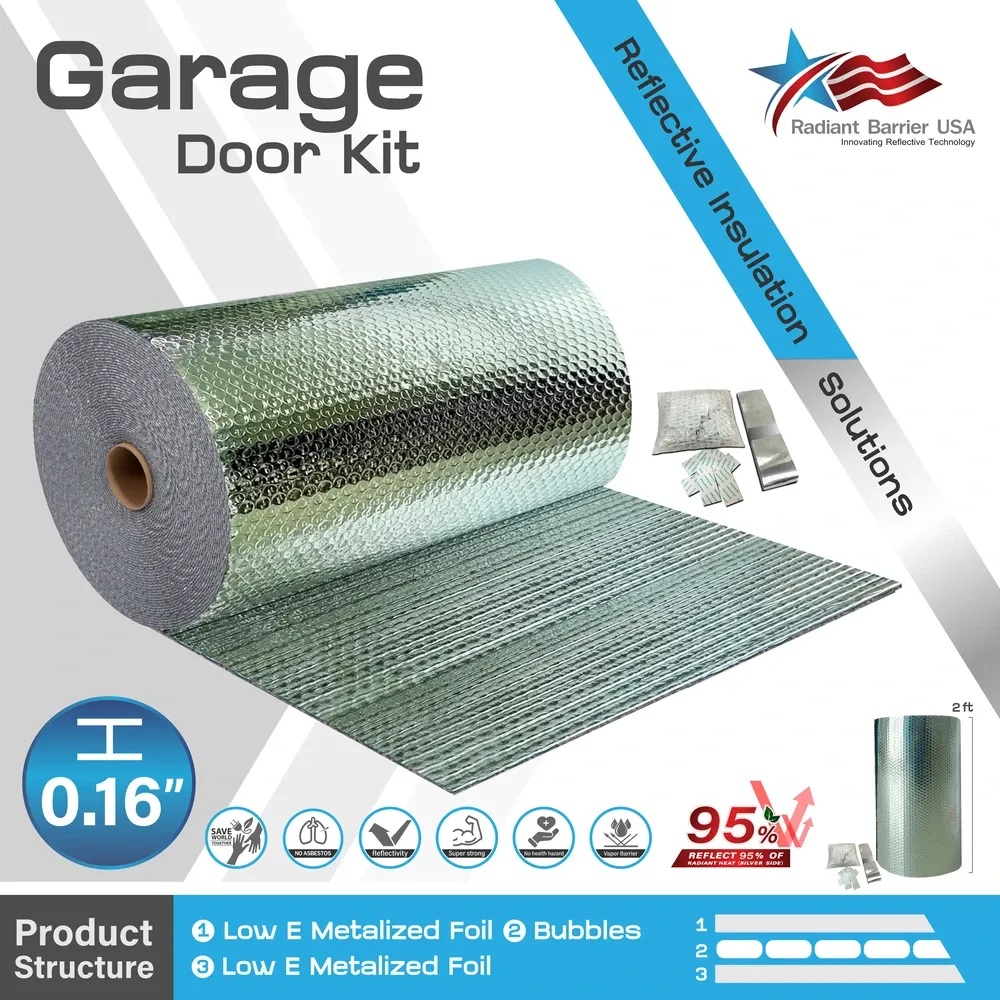
Garage Door Kit At a Glance
| Property | Specification |
|---|---|
| Roll Size | 2' × 80' (160 sq ft) |
| Roll Weight | 12 lbs |
| R-Value (effective) | Up to R-7.5 |
| Radiant Heat Reflection | Up to 95% |
| Emissivity (E) | 5% |
| Fire Rating | ASTM Class 1 / Class A |
| Construction | Double bubble + double foil |
| Coverage | 1 double door or 2 single doors |
The kit ships flat, cuts cleanly with a utility knife, and weighs little enough that it won’t unbalance most residential garage door springs.
Common Mistakes to Avoid
Five mistakes that kill the result
1. Installing the foil side facing inward. The reflective surface only works against radiant heat coming from the hot side. Foil must face the door panel (outward), bubble side into the garage.
2. Not sealing the seams. Gaps between panels and around rails let radiant heat sneak around the insulation. Run foil tape on every edge.
3. Skipping the rail-to-insulation gap. Insulation jammed tight against the rails warps when the door flexes. Leave ¼ inch on every side.
4. Adding too much weight without checking the spring. A 12-lb reflective kit is fine for almost any door. A 40-lb foam panel kit may require professional spring adjustment. Skip that and the opener motor burns out.
5. Using cheap construction film instead of a real kit. Single-bubble or unfaced poly film has 30–40% reflection at best, no fire rating, and will yellow and crack within a few years.
Frequently Asked Questions
Can I insulate my garage door myself?
Yes. A reflective garage door insulation kit takes 60–90 minutes for a single door, requires only a tape measure and utility knife, and ships with everything you need (insulation roll, double-sided tape, foil seam tape). No torsion spring work, no electrical, no wiring.
Is garage door insulation effective?
Yes, measurably. Most homeowners see 15–20°F lower garage air temperature on hot summer days and 30–50°F lower interior door surface temperature. For attached garages, this also reduces HVAC load on the rest of the house. The effect is most dramatic on south- and west-facing doors that take direct afternoon sun, where uninsulated steel can hit 140°F.
How do I insulate a garage door for winter?
The same reflective bubble kit that drops summer temps also slows winter heat loss. The foil reflects interior heat back into the garage instead of letting it radiate out through the cold door panel, and the bubble core resists conductive heat flow. For very cold climates (below 20°F), pair the reflective kit with weatherstripping on the door's bottom and side seals to stop air infiltration. That combination delivers the biggest winter improvement.
Will insulating my garage door void the warranty?
An external reflective kit installed with adhesive tape does not modify the door panel itself, and most manufacturers consider this an accepted aftermarket upgrade. Spray foam, drilled fasteners, or anything that adds significant weight (over 25 lbs total) can void warranty and damage the door. Avoid those methods.
Do I need to adjust the garage door spring after installing insulation?
For a reflective bubble kit (10–12 lbs total), no. The added weight is well within the spring's tolerance. For heavier rigid foam panel kits or factory polyurethane retrofits, you may need a professional to re-tension the torsion spring. Never attempt torsion spring adjustment yourself.
Which side of the reflective insulation faces out?
The shiny foil side must face the garage door panel (the side getting hit by sun and outside heat). The bubble side faces into the garage. Reflective insulation works by reflecting radiant heat back to where it came from. Get this backwards and the insulation barely works.
What's the best garage door insulation for hot climates?
For hot climates (Texas, Arizona, Florida, the Southeast), reflective bubble insulation outperforms foam at the same R-value because it blocks radiant heat, the dominant heat source on a sun-exposed door. Look for a double-bubble double-foil kit with emissivity below 5% and a Class A fire rating. Cheaper single-bubble or single-foil products reflect 30–40% less.
How long does a garage door insulation kit last?
A quality double-bubble foil kit installed with proper tape lasts 15–25 years. The foil doesn't degrade, the polymer bubble core resists UV and moisture, and the only failure mode is adhesive tape letting go after a decade or so. Easily refreshed with new tape.
Can I insulate a wooden garage door?
Yes. The same kits work on wood doors, and reflective insulation pairs well with wood since wood is a better insulator than steel to begin with. Use the same install steps, but verify your tape adhesive is rated for use on wood (most kits include compatible tape).
What's the difference between R-value and radiant reflection?
R-value measures resistance to conductive heat (heat moving through a solid). Radiant reflection measures how much infrared energy bounces off the surface. Reflective insulation has moderate R-value but very high radiant reflection. On a sun-exposed door, radiant heat is the dominant load. That's why a R-7 reflective kit beats a R-10 foam panel in real-world surface-temperature tests.
Start Here
Quick installation and you’ll feel the difference within a day. If your garage bakes in afternoon sun or your energy bills spike in summer, this is the first thing to fix.
Garage Door Insulation Kit (fits most standard doors)
Up to R-7.5, 95% radiant reflection, ASTM Class 1 fire rated. Ships with everything you need to install in 90 minutes.
Have a non-standard door size or a commercial application? Contact our team and we’ll spec it out.